


W1302 temperature control panel is designed for the semiconductor cooler to adjust the environment temperature. It uses the SMD technique to achieve higher performance but lower power. The design of positive and negative element is suitable for the installation of embedding into panels. It has high-speed flash memory chip and the setting of auto memory retention when power off. Its temperature accuracy reach 0.1℃. We can manual switch the status of heating and cooling, the min backlash reach 0.5℃. It also has the function of high temperature alarm, configure controls and screen displaying.
2 Technical Specification
2.1Technical parameter
Technical Term | Unit | Parameter |
rated voltage | VDC | 24(12) |
rated current | A | 10 |
measuring range | ℃ | -40~110 |
temperature measurement accuracy | ℃ | ±0.1 |
2.2Interface spec
1) Power input DC24V(12V)
2) NTC temperature sensor interface
3) TEC power supply DC24V(12V).
!!!W1302 temperature control system is divided into DC12V和DC24V
3. Temperature control system wiring
3.1 Electrical Connection Diagram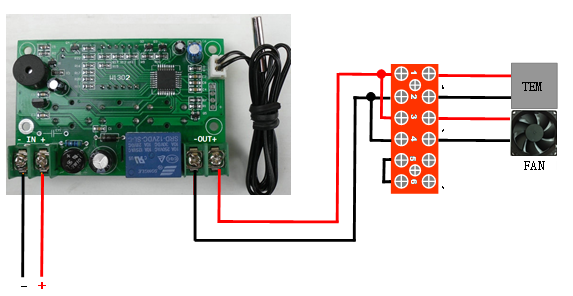
3.2 Electric connection physical map
Please check “W1302_1210 wiring diagram” and “W1302_2410 wiring diagram”
4. Product function
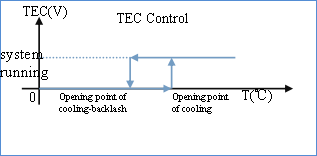
4.1 Cooling
When temperature inside cabinet higher than the opening point of refrigeration, the refrigeration operation starts to run; when temperature lower than opening point, it stops. When setting the point, the stopping point should be lower than the opening one.
refrigeration technical parameter
Parameter | Default | Setting ranges | Description | Set point description |
Opening point of cooling | 28 | [-50~110] | ℃ | The temperature point is set when the cooling operation starts to run |
cooling backlash | 2 | [0.5~15] | ℃ | When the cooling operation runs, it stops backlash |
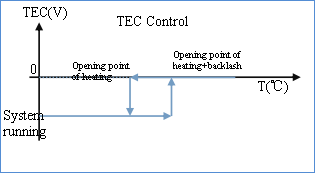
4.2 Heating
When temperature inside cabinet lower than the opening point of heating, the heating operation starts to run; when temperature higher than stopping point of refrigeration, it stops the refrigeration operate. When setting the point, the stopping point should be higher than the opening one.
Parameter | Default | Setting ranges | Description | Set point description |
Opening point of heating | 28 | [-50~110] | ℃ | The temperature point is set when the heating operation starts to run |
heating backlash | 2 | [0.5~15] | ℃ | When the heating operation runs, it stops backlash |
Cooling operation Figure:
4.3 Fault alarm
Temperature control panel has the function of fault detection and fault alarm. Below is the situation and phenomenon of alarm.
parameter | Default | Setting range | Unit | Description | Buzzer | The status of TE when alarming |
High temperature alarm | 110 | [0 –110] | ℃ | The trigger point of high temperature alarm (shutoff function) | working(stop) | working(stop) |
NTC sensor alarm | -- | -- | -- | Sensor detection | working | stop |
!!!High temperature alarm LED display "---", NTC dropped alarm digital display "LLL", NTC short circuit alarm LED display "HHH".
!!!If there NTC alarm, even if the high temperature alarm, the performance is the NTC alarm.!!!When the buzzer sounded the alarm beep - beep - beep - beep.
There are two-colors indicator light on the control panel, below is the definition:
LED | statments | color | status | definition |
Running light | Normal operation | red | light | Output port is open |
flashing | Output port is open delay | |||
Light off | Output port is shut |
6、product use
6.1W1302 operation interface
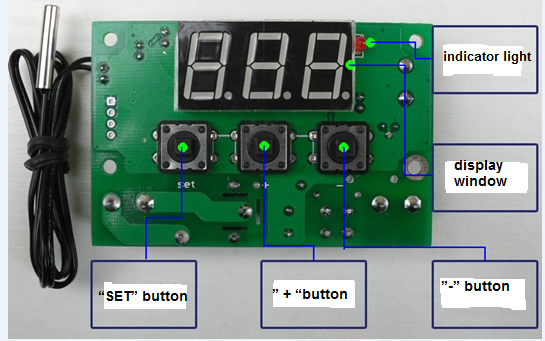
Press down<set> and key up, the numeral tube start to flash. By now, the temperature point of refrigeration can be adjusted by pressing down the <+> or <->; Long press <+> or <->, it can accelerate the changes of number; without any operations toward <+> or <-> within 5s, or press down <set> again, it exit the page.
!!!<+> makes the number increase, <-> make it decrease.
!!!Refrigeration temperature setting is in cooling mode. Please refer to the parameter setting mode switch P0.
6.3 setting the temperature point of heating
The operation is the same as setting the temperature point of refrigeration
!!!Setting the temperature of refrigeration is under the heating mode. If you want to switch mode, please refer to the parameter setting P0.
6.4 Parameter setting
6.4.1 Confinguration parameters changing
Press down <set> for 5s, key up <set> until P0 appear on numeral tube.
See below:
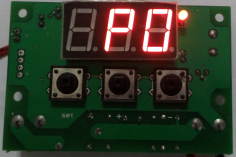
Press <+> or <-> and it can switch from P0 to P8. Within the interface of P0 to P8, just long press <set> for 5s or without any operation, it will auto-exit.
6.4.2 Mode switch1)The numeral tube display P0, see below
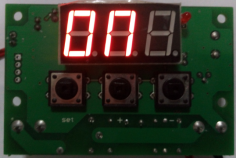
2) Press down <set> and enter into mode switch. If it is refrigeration mode, the numeral tube display C, as shown below.
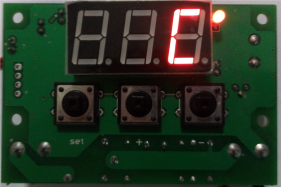
3) Press down <+> or <->, it can switch the mode. As shown below, it turns into heating mode.
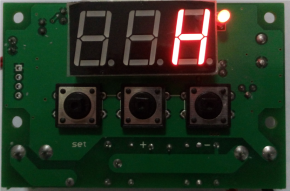
4) Re-press <set>, it will turn back to P0 interface.
6.4.3 Return difference values setting (P1)
1)The numeral tube display P0, press down <+>;if the numeral tube display P2, press down<->;make the numeral tube display P1.
2)Press down <set> and enter into return difference values setting.
3)Press down <+> or <-> to amend return difference values( Long press <+> or <-> to accelerate the speed of number change)
4)Press down <set> again, turn back to P1 interface.
!!!“Return difference” refers to:(Heating mode) Temp≥Temp point of heating +Return difference values, TEC stops;
(Refrigeration mode) Temp≤Temp point of refrigeration +Return difference values, TEC stops.
6.4.4 Temperature upper limit setting (P2)
1)The numeral tube display P1, press down <+>; if the numeral tube display P3, press down <_>; make the numeral tube display P2.
2)Press down <set> and enter into high temperature limit setting.
3)Press down <+> or <-> to amend the high temperature limit values ( Long press <+> or <-> to accelerate the speed of number change).
4)Press down <set> again, turn back to P2 interface.
!!!“High temperature limit” refers to: the temperature of heating or refrigeration cannot exceed this upper limit value.
6.4.5 Temperature lower limit setting (P3)
1)The numeral tube display P2, press down <+>; if the numeral tube display P4, press down <->; make the numeral tube display P3.
2)Press down <set> and enter into low temperature limit setting.
3)Press down <+> or <-> to amend the low temperature limit values ( Long press <+> or <-> to accelerate the speed of number change).
4)Press down <set> again, turn back to P3 interface.
!!!“Low temperature limit” refers to the temperature of heating or refrigeration cannot exceed this lower limit value.
6.4.6 Temperature correction
1)The numeral tube display P3, press down <+>; if the numeral tube display P5, press down <_>; make the numeral tube display P4.
2)Press down <set> and enter into temperature correction.
3)Press down <+> or <-> to amend the temp correction values.
4)Press down <set> again, turn back to P4 interface.
!!!“Temperature correction” refers to: The present temp value +correct value= displayed value of numeral tube
If the present temp value is 25℃, correct value is -1.5℃, the numeral tube will display 23.5℃。
6.4.7 Delay starting time (P5)
1)The numeral tube display P4, press down <+>; if the numeral tube display P6, press down <_>; make the numeral tube display P5.
2)Press down <set> and enter into delay starting time setting.
3)Press down <+> or <-> to amend delay starting time.
4)Press down <set> again, turn back to P4 interface.
!!!"Delay start _" refers to: TEC stop, delay, TEC start; from TEC stop and TEC start time interval is less than the delayed start time, then the TEC will not start, wait timeout TEC to start. Conversely start.“.
For example, in the cooling mode, the current temperature is 29 ℃, cooling temperature 28 ℃, hysteresis 2 ℃, delay start 5min; TEC start cooling, when the temperature reaches 26 ℃ stop cooling, then start the timer, if it takes 1min to go back from 26 ℃ to 28 ℃ , 4min you need to wait until the TEC to start cooling. If warmed by more than 5min, then TEC starts cooling immediately.
6.4.8 Key tone switch(P6)
1)Digital display P5,press <+>;or digital display P7,press <->;making digital display P6.
2)Press <set>,Enter key tone is turned on and off, if the current key tone is off, then the digital display OFF, as shown below.
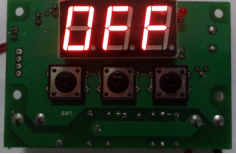
3)Press <+> or <-> to switch ON or OFF.
4)Press again <set>,return to P6 interface.
!!!If set to ON, then press the button, the buzzer will issue a "D" sound.
6.4.9 High temperature alarm(P7)
1)Digital display P6, press <+>; or digital display P8, press <->; making digital display P7.
2)Press the <set>, to enter the high temperature alarm switch.
3)Press <+> or <-> to modify the temperature alarm on or off.
4)If it is turned on, the digital display ON, press again <set>, enter the setting high temperature alarm values.
5)Press <+> or <-> to modify the high temperature alarm value.
6)Press <set> again,return to P7 interface.
7)If it is turned off, the digital display OFF, press the <set> again, return to P7 interface.
!!!If set to ON, when the temperature exceeds the high temperature alarm value, the beeper DDD sound, while digital display "---"
6.4.10 Reset (P8)
1)Digital display P7,press <+>;or digital display P0,press <->;make digital display P8.
2)Press <set>,Enter restore factory enabled.
3)Press <+> or <-> to modify ON or OFF。
4)If select ON,press <set> again,it will turn to P8,wait for 1. It will restore the factory settings when exit parameter settings.
5)If select OFF,press <set> again,it will turn to P8 interface. It won’t restore the factory settings.
Setup Checklist
Code | Code Description | Setting range | Factory settings |
P0 | Cooling / Heating | C/H | C |
P1 | backlash setting | 0.5℃~15℃ | 2 |
P2 | Setting an upper limit temperature | 110℃ | 110 |
P3 | Temperature setting limit | -50℃ | -50 |
P4 | Temperature correction | -7.0℃~7.0℃ | 0 |
P5 | Delay Start Time | 0min~10min | 0 |
P6 | Buzzer switch | ON/OFF | ON |
P7 | High temperature alarm | 0℃~110℃ | OFF |
P8 | reset | ON/OFF | OFF |